App Guide: POS
POS (which stands for Point of Sale) is a lightweight, single-page Director App that provides a fast and responsive way to record merchandise sales. It is intended for use at race venues to allow event staff to quickly process in-person merchandise sales. It works best on a dedicated tablet device – in Landscape orientation – at the merchandise sales desk and works just like a modern cash register in a store.
Event staff can quickly record any merchandise selections on the screen by clicking on product photos and selecting options (e.g. tshirt size) from the pop up. A running tally of the items in the “cart” are shown on the right side of the screen alongside the total payment due and available payment methods. The system is designed to record anonymous sales in a fast and efficient manner – but the confirmation screen also allows the sale to be optionally sent to an email address or attached – via quick race number lookup – to a registration from that particular event.
How Is It Accessed?
POS is accessed through a single URL per event. The URL has the event access key embedded into it, meaning that it can be emailed to anyone you want to be able to access the search, but they do not need to be authorised users of Director. This is handy as volunteers/helpers at the registration venue can be given access without allowing them to see the rest of your Director data.
You can find the POS URL on Event Dashboard. Go to the Actions button and select POS Setup. There is also a blue action button on the Dashboard info panel to launch POS directly.
How Does It Work?
POS makes use of Javascript, a widely used web browser technology that is at the heart of all modern web applications. When the page first loads, POS downloads all merchandise products, skus and pricing information to the local browser. From there, all cart actions are processed directly in the web browser, guaranteeing virtually instantaneous response times.
POS Supports payment by offline methods (e.g. Cash) or Credit Card using an e-com gateway. It also supports Free Carts and includes a Pay Later option.
It is only when the transaction is confirmed that POS communicates with the live server to record the transaction in a cart on Director and process the payment.
POS is keyed to a specific Event within Director (which is why it is launched from Event Dashboard). However, since it is based around Products and Carts, it requires a Store to work. For this, POS selects the Associated Store for the event, which you can view and edit on the Event Dashboard. Products displayed on POS and carts created will all be attached to this Store.
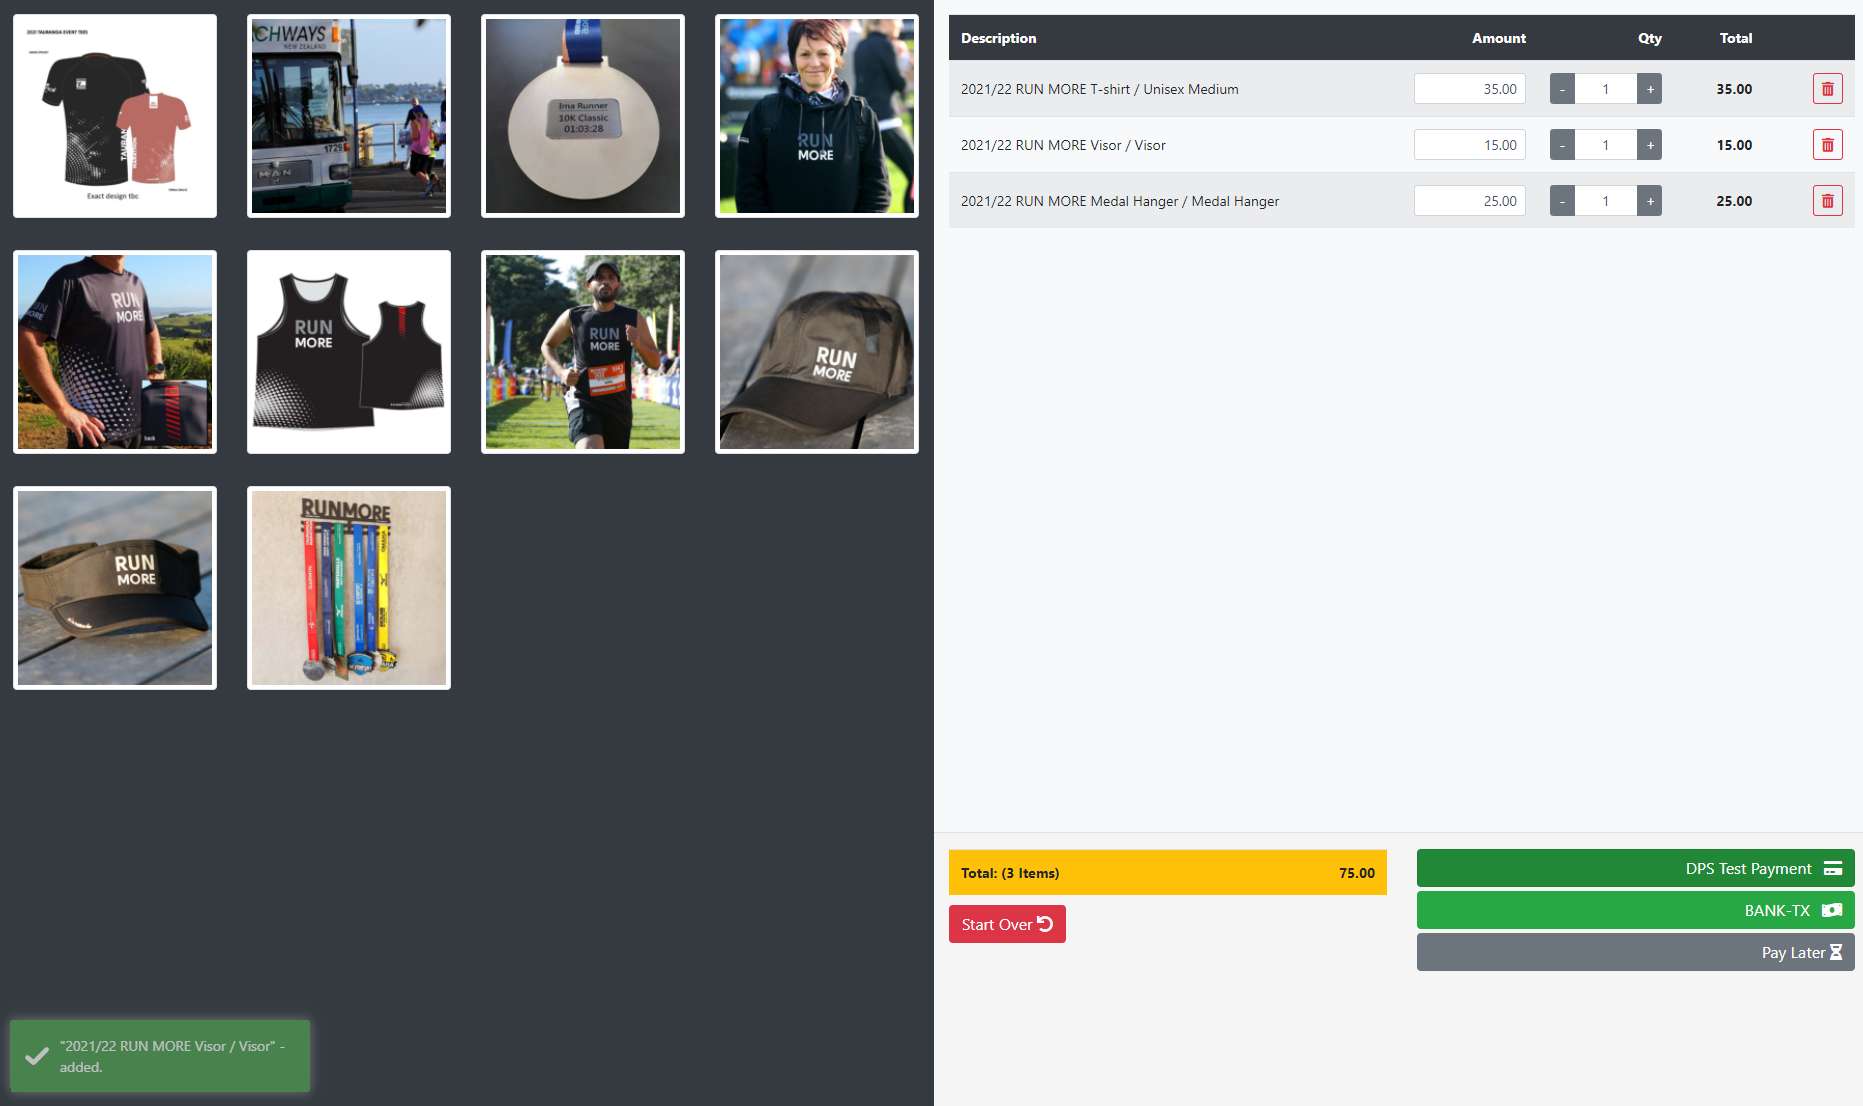
POS STORE FRONT
The main Store Front in POS is split into two equal halves (and is designed to work best on landscape orientation tablets). The left side of the Store Front contains product images for all products active in the default store attached to the event. The right side contains the cart. On initial load, the cart will always be empty and all that will show on the right side is the cart total (set to zero). We can go into more details on these areas now.
PRODUCT CHOOSER PANE (Left Side of Store Front)
The product chooser will display a list of all Products of type Merchandise from the Associated Store (see above), provided they have an active SKU with an active Pricing Band. Each product is represented by the product thumbnail image. Since there is no other identification on the screen, it is important if using POS that all merchandise products have an image uploaded.
When the operator clicks on a product image, a popup shows all of the available SKUs for that product and their current price. Clicking on any SKU will add the product to the cart (shown on the left side of the screen). Note that selecting the same SKU twice will result in the quantity field for that SKU being incremented on the cart display (the SKU will not appear as two seperate lines in the cart). Note that even if the product only has one SKU, the popup will still be shown and the single button displayed acts as confirmation of the selection.
Important! POS will allow the selection of SKUs that are technically Out of Stock based on their current stock levels. The reason for this is it is assumed the operator of the POS terminal physically has the product in their hands and so can overrule the recorded stock levels on Director.
CART PANE (Right Side of Store Front)
The upper part of the Cart Pane displays a list of all of the items selected in the current transaction. Each line represents a single SKU and each SKU can only appear in this list once. The lines items are organised as follows:
- Description: This is the Product Name followed by the SKU Name.
- Amount: This is the cost of this item. The cost of the item is taken from the current SKU pricing band.
Important! A Temporary Price Adjustement can be made by typing a new value into this box. When this is done, the price adjust will stay in force until the transaction is completed or the POS screen reset using the Start Over action button. - Qty: The quantity of this SKU being purchased. This always defaults to 1 but can be increased or decreased using the spin fields on either side of the quantity textbox. Note that decrementing the quantity from 1 will cause the line to be deleted (the same as hitting the Delete icon). Note also that selecting the same SKU twice from the Product Chooser will increment the quantity for that SKU but 1 – it will not create an additional line in the Cart. Each SKU can only appear in the cart once.
- Total: The line total which is calculated simply as Amount x Qty
- Delete: Click this icon to delete the SKU from the cart.
The lower part of the Cart Pane shows the following items:
- Totals Box: Shown in YELLOW. This box shows the Count of Items in the cart and the Total Value of these items
- Start Over: Button Shown in RED. This button will clear all items from the cart and reset any temporary price adjustments ready to begin a new transaction.
- Payment Method Buttons: Shown in GREEN. One button will appear for each Payment Method which is switched on for “Express” transactions in Store Dashboard -> Payment Methods (tab). There are two types of Payment Method Buttons …
1) Offline / Cash payment methods will show a Dollar Bill Icon and clicking on them will load the Pay by Cash modal (see below).
2) Online / E-commerce payment methods will show a Credit Card Icon and clicking on them will load the Pay by Card modal (see below).
Important! Payment method buttons only appear when the Total Value of the cart is greater than zero. - Continue (Free Cart) Button: Shown in GREEN. This button is used for carts which have items but the total Amount is zero (i.e. they are free). This can happen when the SKU is originally priced at zero but – more likely – where an item of merchandise is being given away free and the temporary price adjustment function has been used to set it to zero.
Important! This button only appears when the count of items in the cart is greater than zero and the Amount is equal to zero. - Pay Later Button: Shown in GREY. This button allows the cart to be approved (and merchandise should be handed to the customer) but arrangements for payment are to be made later on. The cart will live in the system in an unbalanced state. Clicking this button will load the Pay Later modal as described below.
Important! This button only shows when the Total Value of the cart is greater than zero.
Important! When using this function, it is important to attach the cart to a registration in the confirmation screen, otherwise it will be anonymous and difficult to reconcile later and recover the payment.
CART APPROVAL / PAYMENT POP UPS
There are four possible ways to complete a transaction – each with its own popup window and a confirmation button:
- PAY BY CASH
POS treats any offline Payment Method as a cash transaction. That it, it assumes that upon confirmation, the payment has been received and the cart can be approved. For this reason, offline payment methods such as BANK-TX or CHEQUE should not be used (and generally are not enabled for “Express” transactions). When such a payment method is selected, the cash drawer pop is shown. This popup can be used to tally notes and coins received and will display to the operator an ongoing tally of the state of the payment, plus the action required. This action can be in one of three modes:
i. REQUIRED $x.xx : displayed in RED. Shown when the notes and coins amount is less than the payment required.
ii. BALANCED $0.00: displayed in GREEN. Shown when the notes and coins amount is equal to the payment required.
iii. CHANGE $x.xx: displayed in YELLOW. Shown when the notes and coins amount is greater than the payment required.
Important! Use of the cash tally functionality is optional and is not recorded in the database.
Clicking the Confirm button will create and approve the cart and complete the transaction.
- PAY BY CARD
Selected an online/e-commerce Payment Method will show a popup window to confirm the amount to be paid, ready to redirect to the selected e-commerce gateway payment page. Although not essential, it is generally reccommended the POS tablet is now directed to the customer to allow them to complete the transaction themselves. This ensures event staff do not need to handle the customer’s credit card.
Clicking the Make Payment button will redirect the page to payment gateway.
Important! Unfortunately, after an unsuccessful e-com payment, the cart will be emptied and SKUs will have to be selected again.
- FREE CART
The Free Cart popup is shown when there are items in the cart but the Total Amount is equal to zero. That means the items are being given for free, but the Free Cart function can be used to still record the “sale” and update stock counts.
Clicking the Confirm button will immediately create and approve the cart and complete the transaction.
- PAY LATER
There may be circumstances where a (trusting) event organiser may provide the merchandise items to a recipient on the promise that payment will be made at a later date. To ensure this is properly recorded, POS provides a Pay Later function where the cart and items will be saved to the database but no payment record. This means the payment has been captured and can be quickly located later on (using the Unbalanced Carts option in Cart search) to process payment.
Important! When using this function, it is important to attach the cart to a registration in the confirmation screen, otherwise it will be anonymous and difficult to reconcile later and recover the payment.
Clicking the Confirm button will immediately create and approve the cart and complete the transaction.
POS SUCCESS/CONFIRMATION
The Success page will show after each successful transaction. The page shows a large SUCCESS heading and has the following additional features:
- Attach to Registration
By typing in the participants race number here, Director will do a lookup to check the details for this participant. A confirmation popup will be shown to ensure the correct person has been located. Upon confirmation, the Cart will be attached to the same Person as the Registration and all of the items in the cart will be attached to the Registration. Once the registration has been confirmed, the Race Number field will no longer be editable (so it cannot be changed on this screen after it has been confirmed) and the email address will be pre-filled (in an anonymised format) in the email field should the person ask for an email receipt.
Important! Be sure to use this function for any Pay Later transactions to help identify them afterwards.
- Send Receipt by Email
Should the person making the purchase require a receipt, an email address can be entered here and an email with a link to the PDF e-receipt will be sent to them.
Important! Where the transaction has been attached to a registration using the method above, the email address is pre-filled here and cannot be changed.
- Return to Store Front Button
Click this button to immediately return to the POS Store Front to begin a new transaction.
- Auto- Return
To enable efficient use of the POS device, the confirmation screen will automatically be replaced by the POS Store Front after 60 seconds. However, if either of the two functions above (attach to registration or send email receipt) are activated, the auto-return function will be disabled. It is also possible to disable the auto-return by clicking on the action button drop down next to the “Return to Store Front” button.